Will Siri only work on iPhone 4S? What about iPad?

Siri on iPhone 4S
During my pre-Apple days, I was already fascinated by a voice recognition program called Dragon Naturally Speaking.  I dabbled with it for a while but since the hardware needed to run the program was on the extreme side, I could say that I didn’t get what I expected from the program.  It was just too tedious to do: check that you have a powerful enough system, install the software, train the program for about ten years (just kidding) in a very quiet atmosphere so that it’ll learn your voice and words at the same time, further train it so that it can follow commands and then wait for the garbage to come out on the screen. Frustrating indeed!

Fast forward to the present and we see Apple presenting Siri to a captive audience during its recent media event and launch of iPhone 4S on October 4th. Sure, Apple has attempted to give voice recognition to its older releases of the iPhone, particularly the 3GS and the iPhone 4, but voice control for these iPhones is really just an experiment when compared to Siri, iPhone 4S’ exclusive Voice Assistant.
Still, I was a little bit disappointed with the release of iOS 5 that Siri has remained an iPhone 4S exclusive. As we all know, the iPhone 4S is powered by the same A5 processor used in the iPad 2. And the iPad 2 also has a built-in microphone – I’m wondering why Siri is not available my beloved iPad.
But before we go into that any further, let’s just check the existing state of Voice Control for the iPhone 3GS and 4. Right now, Voice Control for these devices just doesn’t function on either the iPad or the iPad 2 for the very simple reason that they would be totally useless. The presently available Voice Control on these older devices simply lets you control music playback, dial a contact number, start a FaceTime call, get some info about the currently playing music or get the time… Not much really. But the reason for this is that the older iDevices’ hardware is not powerful enough to handle anything more.
Now comes Siri with its myriad commands specifically designed for a powerful device such as the iPhone 4S.  So the iPhone 4S is announced with Siri in tow but why not for the iPad 2 which shares the same hardware as the newly announced iPhone 4S?  Everything presented during the Apple event – from setting up Reminders and posting Calendar events to searching for anything and everything in Wiki – all of these can be done using the iPhone 4S AND the iPad 2!
Perhaps Apple has reason which it chooses to keep a secret right now. Perhaps Siri’s usefulness must first be tested before Apple rolls it out to iPads. Anyway, all I know is I want SIRI on my iPad and I want it now!
If I can’t get Siri from Apple then I do know I can get it somewhere else…  You know how busy the jailbreaking community can be and it won’t be long before they come out with something like or even better than Siri for iPad.

Setup iCloud in iOS 5 & Mac OS X 10.7.2


iCloud 
Apple has rolled out iCloud, the cloud syncing service that automatically syncs all your content to all of your devices, be it an iPhone, iPod touch, Mac, PC, iPad, whatever. It also includes things like Find My iPhone and Find My Mac, in addition to several web apps that let you get your Mail, Contacts, and Calendar while on the go, via any web browser. It’s an awesome service, it’s free, and you don’t want to miss it. Here’s how to set it up from any iPhone, iPad, or Mac:
iCloud Requirements
First things first, you’ll need the latest versions of iOS and/or Mac OS X.

  • An Apple ID – same as an iTunes account or MobileMe login
  • iOS 5 update – for iPhone, iPad, or iPod touch
  • Mac OS X 10.7.2 updated – for Mac users
  • iTunes 10.5 installed – required for PC & Mac users
Have those installed and ready to go? Here’s how to set up a free iCloud account:

Setup iCloud from an iPhone or iPad with iOS 5

First be sure you have upgraded your iPhone, iPad, or iPod touch to iOS 5, .
  • Tap on the Settings app
  • Tap on “iCloud”
  • Choose “Sign in with an Apple ID” (alternately, you can create a new account entirely by selecting “Create a free Apple ID”)
  • Enter your existing Apple ID (iTunes account), or an older MobileMe account
  • Choose “Use iCloud” at the setup screen
  • Tap the “ON” switch for the types of data and services you want to sync with iCloud: Mail, Contacts, Calendars, Reminders, Bookmarks, Notes, Photo Stream, etc
By default you get 5GB for free, but the iCloud plan prices are reasonably cheap if you require more storage.

Setup iCloud from Mac OS X 10.7.2

Obviously you’ll need your Mac updated to OS X 10.7.2, get it from Software Update .
  • Open “System Preferences” from the Apple menu 
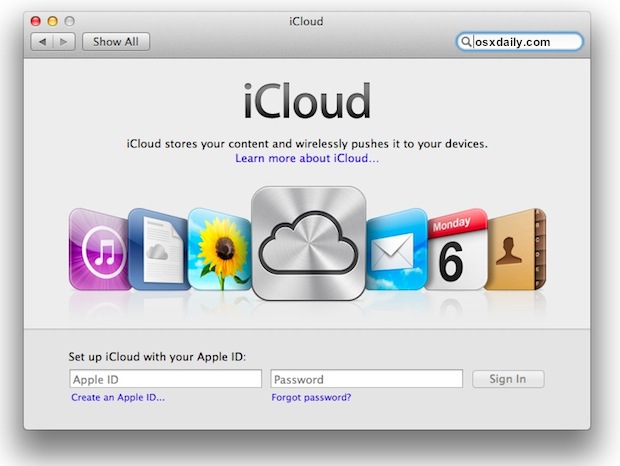
  • Select “iCloud” under the ‘Networking’ section
  • Enter an Apple ID which is the same as an iTunes account, MobileMe login, or create a new Apple ID if you don’t have one yet
  • Accept the EULA and choose which apps and items you want to sync with iCloud
You can change iCloud settings at any point by going back to this preference panel.

iCloud setup for Mac OS X 10.7.2

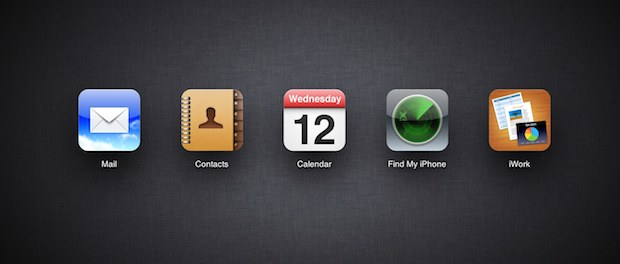
Once you have configured iCloud, you can also visit iCloud.com to use the webapps, accessing Mail, Contacts, Calendar, Find My iPhone and Find My Mac, and iWork online. Just login with your aforementioned iCloud/Apple ID and you’ll be good to go.
iCloud web apps

[tutorial] Wi-Fi Sync for iPhone, iPad, & iPod touch with iOS 5

By far one of the best features of iOS 5 is wireless syncing and backing up, as the name implies it allows you to wirelessly transfer apps, music, books, contacts, calendars, movies, photos, everything you had to use a wired sync for, but it’s done through the air. If your device supports iOS 5, it’ll support Wi-Fi syncing, including iPhone 3GS, iPhone 4, iPhone 4S, iPad, iPad 2, and iPod touch 3rd & 4th generations.
Wireless syncing requires iOS 5 and iTunes 10.5 or later, be sure you have both installed before attempting to enable syncing through wi-fi or else the option won’t be visible. This setup process is the same on Mac OS X and Windows, and is fully compatible with both if you are syncing to the different platforms.

Set Up Wireless Syncing in iTunes 10.5 & iOS 5 for iPhone, iPad, & iPod

You’ll have to connect your iOS device to your computer to set it up, but after that you’re wire free with the exception of charging the hardwares battery.
From iTunes 10.5+
  • Connect the iOS device to the computer
  • Open iTunes and click on your iPad, iPhone, or iPod touch from the left side of the window
  • Click on the “Summary” tab in iTunes
  • Scroll down and click the checkbox next to “Sync with this iPhone over Wi-Fi” (or iPad or iPod touch)
Enable wireless syncing in iOS 5 for iPhone and iPad
With the iTunes side enabled, now pick up the iOS device to finish the process:
From iOS 5
  • Launch “Settings” and tap on “General”
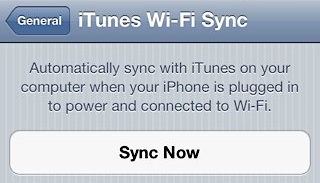
  • Tap on “iTunes Wi-Fi Sync”
  • Select the computer you set up wi-fi syncing on in the prior iTunes step
  • Tap on the “Sync” button to start the wireless syncing
You can also double-check that this is working by disconnecting the iPhone or iPad and then choosing the “Sync” option from iTunes on the Mac or PC, you’ll see the familiar sync screen on your device.

Using Wi-Fi Syncing with iOS 5

Once wi-fi syncing is enabled and set up properly, the iOS device will automatically sync wirelessly any time the hardware is connected to a power source, including the USB cable, speaker docks, or otherwise. This process will also backup your iPhone or iPad automatically and wirelessly. Other than that automatic process, you can also initiate manual backups and syncing from the iPhone/iPad or from iTunes on the Mac or PC:
Start a Wireless Sync from the iOS 5 Device
  • Tap to “Settings” > “General” > “iTunes Wi-Fi Sync” and tap on the ‘Sync’ button
Start Wi-Fi Sync from iPhone
At any point you can cancel this by tapping the “Cancel Sync” button.
Start Syncing Wirelessly from iTunes on a Mac or PC
If you want to initiate a manual sync, you can continue do so by selecting that button within iTunes.

Start a wireless sync in iTunes to iOS device
If you want to really take advantage of wi-fi syncing and the PC-free experience, don’t forget to sign up for iCloud too, it’s very easy and free for the first 5GB of cloud storage with Apple.
Troubleshooting Problems with Wireless Syncing
There’s a variety of potential issues and fixes, Apple provides has a few helpful tips if you run into any issues:

  • Verify the iOS device is running iOS 5 and the PC or Mac is running iTunes 10.5 or later
  • Quit and relaunch iTunes
  • Restart the iPhone, iPad, or iPod touch
  • Reset the wireless router
  • Verify the iOS device is connected to the same Wi-Fi network as the Mac / PC
  • Check for network interference from cordless phones, metal barriers, interfering wi-fi signals, microwaves, etc
  • Verify firewall settings and that TCP ports 123 and 3689 in addition to UDP ports 123 and 5353 are open and accessible (these are ports iTunes uses)
There doesn’t seem to be any limitation on the number of iPad, iPhone, or iPod touch devices that can be used with this, although you may run into the traditional limit of Macs or PC’s that an iOS device can be linked to.

fix iOS 5 Battery Drain Problem

Got some battery drain after upgrading to iOS 5? Want some help to improve your battery life on iOS 5? If so, this post will surely help you. We’ve received some tips and tricks to fix any battery drain you’re facing after iOS 5 upgrade.

iOS 5 Battery Drain Problem Fix

iOS 5 Battery Drain Fix

  • Reset Network Settings: Tap on “Settings” > Reset > Reset Network Settings
  • Disable Bluetooth: Settings > General > Bluetooth > “OFF”
  • Disable unwated Notifications & apps: Settings > Notifications > Turn OFF for anything you don’t need
  • Disable Location Service: Settings > Location Services > Disable selectively for services you don’t use
  • Disable Timezone Adjustment: Tap on “Settings” > “Location Services” > ‘System Services’ > Setting Time Zone to OFF
  • Disable Ping: Settings > General > Restrictions > Enable Restrictions > Ping > OFF
  • Disable Diagnostic & Usage Reports: Tap on “Settings” > General > About > Diagnostic & Usage > Don’t Send

One more tip:

Disable Email accounts by heading to Settings > Mail, Contacts, Calendars > Account Name > Delete Account. Once done, reset network settings (the first tip up there) then reboot your device and re-add your accounts back from Settings > Mail, Contacts, Calendars > Add Account.

Fix Error 3200 iOS 5 Updating In iTunes

Getting Error 3200 while upgrading to iOS 5? Need a fix for that? Well, Error 3200 is “an internal error occurred” that happens while upgrading to the newest software iOS 5. The error is as a result of the huge traffic on Apple’s servers. We have got a method sent to use in the tips box and we would like to share it.

Fix Error 3200 iOS 5

Fix Error 3200 While Updating To iOS 5

STEP 1: After downloading and installing iTunes 10.5. Run iTunes for 10 minutes then close it.
STEP 2: Navigate to the following folder:
  • Windows:  C:\Documents and Settings\”UserName”\Apple Computer\iTunes\iPhone Software Updates
  • Mac OS X: ~/Library/iTunes/iPhone Software Updates
STEP 3: Now cut and paste the files there to a folder on your desktop. (WARNING: Don’t delete them, just cut and paste) 
STEP 4: Put your iPhone into DFU Mode by following our guide 
STEP 5: Finally, open iTunes and go with iOS 5 restore procedure.
Let us know in case you got better solution.
UPDATE: We’ve heard that putting the device in DFU mode only is enough to fix the error.
UPDATE: Check the comments for some useful solutions and discussions.

How To: Jailbreak iOS 5 With RedSn0w 0.9.9b5 On iPhone 4, iPhone 3GS

With the release of iOS 5 things have been very busy! This didn’t stop the iPhone Dev-Team from releasing an update for RedSn0w bringing RedSn0w to version 0.9.9b5. In this new version of RedSn0w (for Mac OS X users only at this time) you can Jailbreak iOS 5 in only a few clicks. Follow the how to guide below to Jailbreak tethered the iPhone 4 and iPhone 3GS running iOS 5 (official version) on Mac OS X.

Step 1: Download RedSn0w 0.9.9b5 for Mac OS X using the download mirror below
Mirror #1: RedSn0w 0.9.9b5 (Mac OS X)
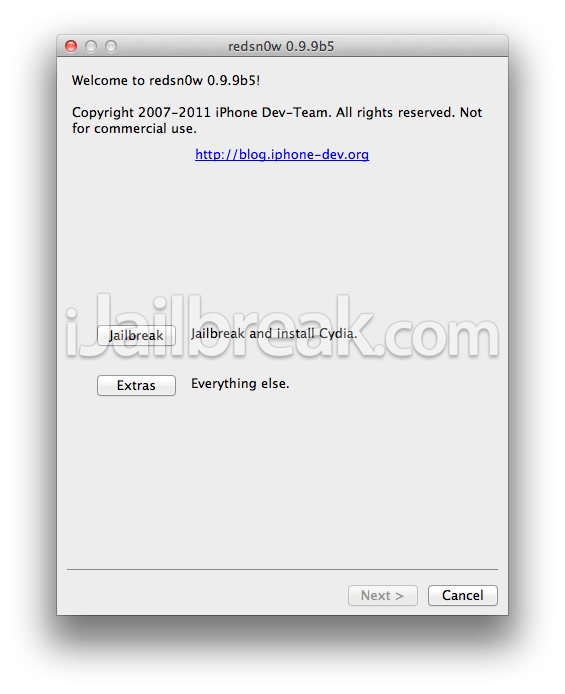
Step 2: Once you have downloaded RedSn0w version 0.9.9b5 you will need to launch it by double clicking on the redsn0w app.
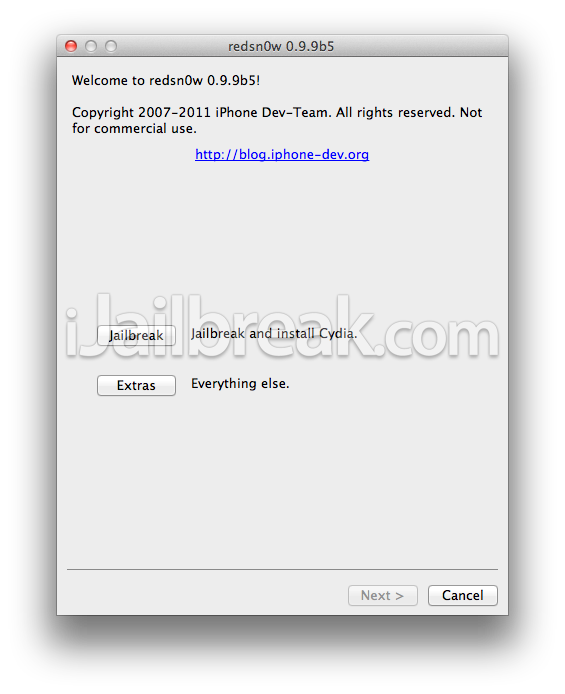
Step 3: With RedSn0w up and running you will then click the Jailbreak button.
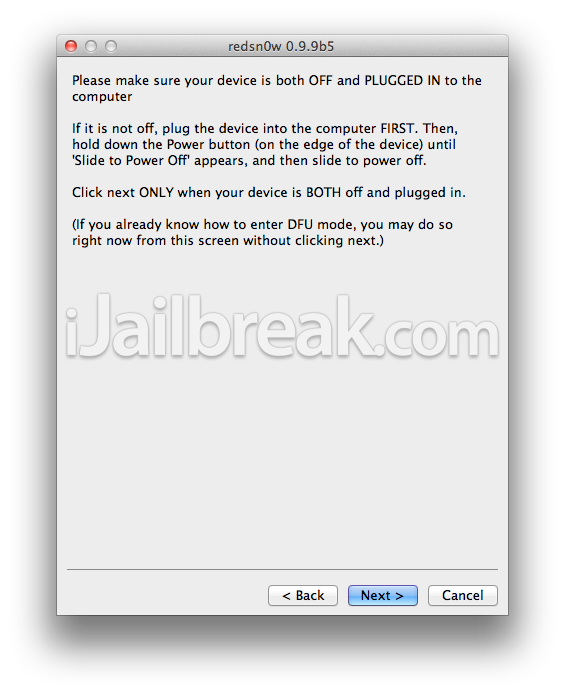
Step 4: Click the Next button and you will come to a screen where you will need to put your iPhone into DFU mode. Read through and follow the instructions presented to you which is to plug in and power off your iPhone and click the Next button.
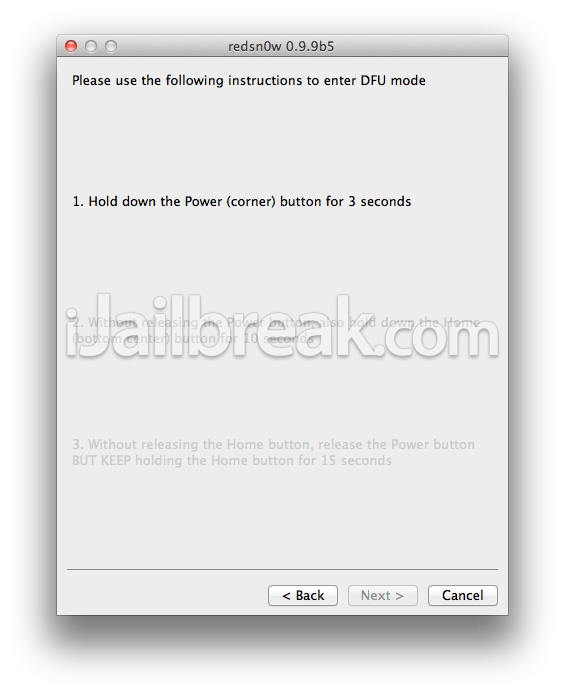
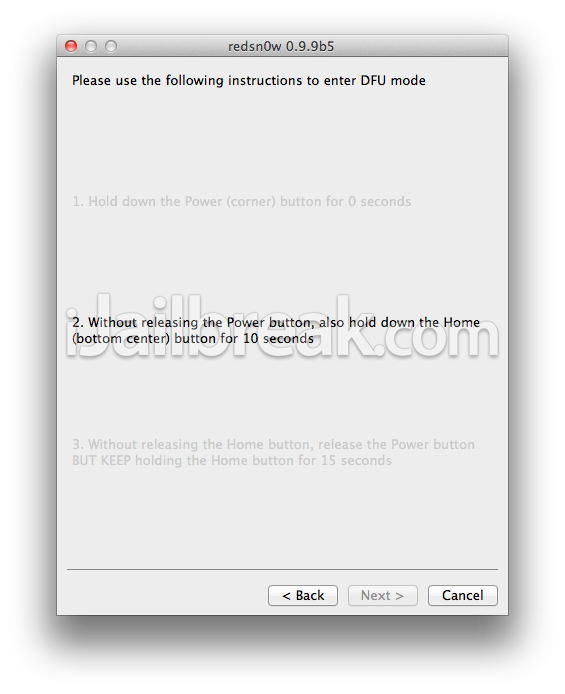
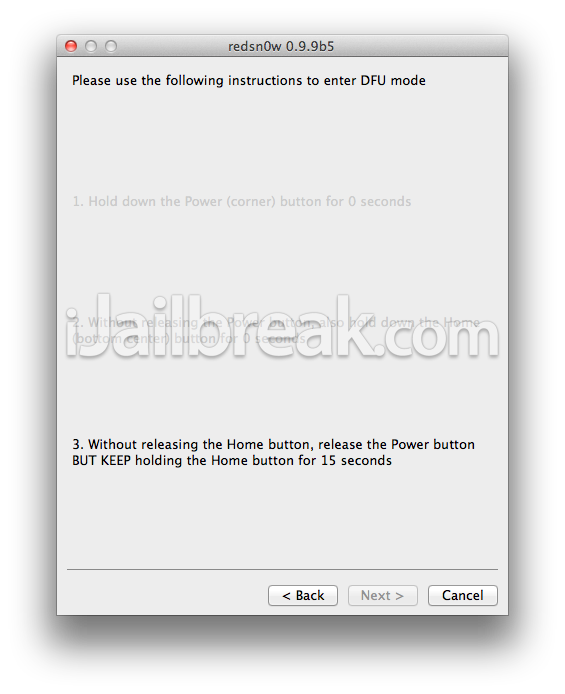
Step 5: When you click the Next button you will need to follow the instructions presented to you to put your iPhone into DFU mode.
  • Hold down Power (corner) button for 5 seconds.
  • Without releasing the Power button, also hold down the Home (bottom center) button along with the Power button for 10 seconds.
  • Without releasing the home button, stop holding down the power button for up to 15 seconds.
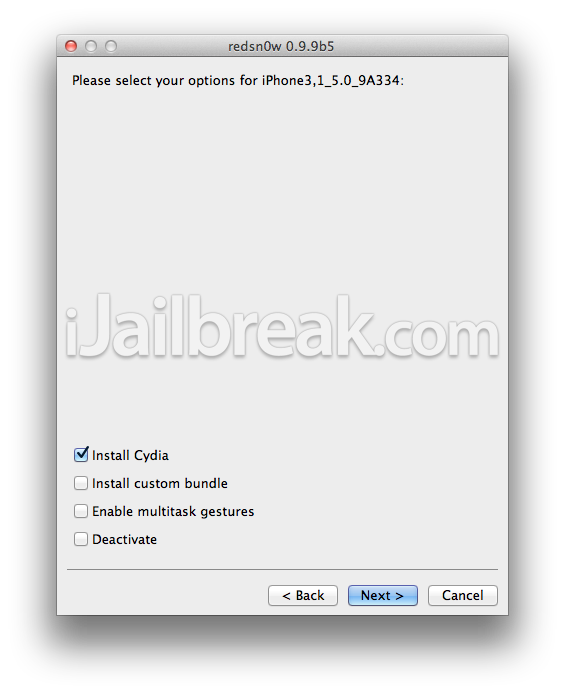
Step 6: After you successfully enter DFU mode RedSn0w 0.9.9b5 will now prepare the jailbreak data. Once RedSn0w is done ensure the “Install Cydia” option is checked and click the Next button.

Step 7: RedSn0w will begin jailbreaking your iPhone. DO NOT interrupt or use your Mac during this time. When your iPhone is finished being jailbroken it will reboot into a jailbroken state. Congratulations!
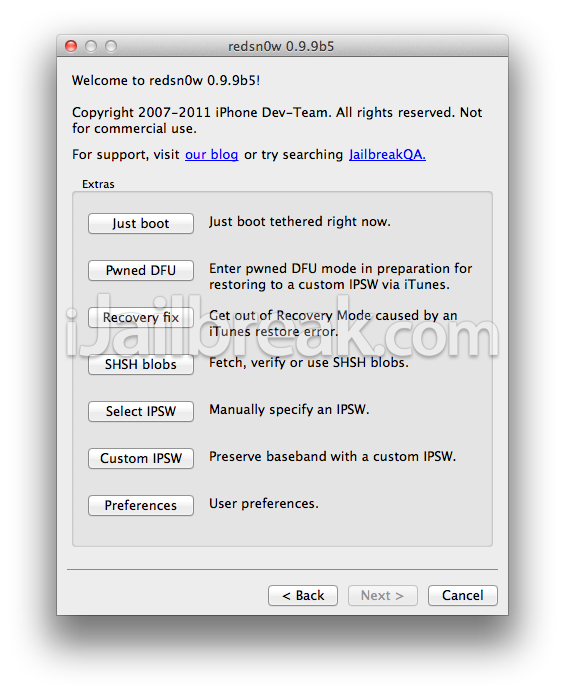
Optional: Booting Tethered - When you Jailbreak your iPhone running iOS 5 (official version) you will have a tethered Jailbreak. Meaning in order for your iPhone to turn back on you will need to boot it using RedSn0w (this applies every time your iPhone looses power). To do this launch RedSn0w again and click the Extras Button > then click the Just boot button and you will need to put your iPhone into DFU mode again.


Note: Yes, you need to do this every time your iPhone looses power.

Download RedSn0w 0.9.9b5 To Jailbreak iOS 5


This new version of RedSn0w has been dubbed RedSn0w 0.9.9b5 by the Dev-Team and is the most reliable way to Jailbreak iOS 5 tethered. RedSn0w 0.9.9b5 is only available to download for Mac OS X as the Windows version will be coming soon after more testing.
Straight from the Dev-Team’s website:
Update #13:  With today’s official iOS5 release, redsn0w has been updated to 0.9.9b5 to include the public URLs for the IPSW files.  This way, first-time iOS5 jailbreakers don’t need to supply the IPSW file manually.  It’s still a tethered jailbreak on all except the old-bootrom iPhone3GS, and it doesn’t apply to iPad2 or the upcoming iPhone4S.
Because the jailbreak is currently only tethered for most devices, we’re not going to release a new PwnageTool yet.  Instead, we’ve decided to build some of PwnageTool’s functionality into redsn0w (since you need redsn0w to “Just boot tethered” on every power cycle anyway).  The new “Custom IPSW” button on the Extras screen will create a custom IPSW without the baseband update for 4.3.3 or 5.0gm (iPhone3GS and iPhone4 only, for now).  Remember not to accidentally restore to the stock IPSW after you create the custom one!  The custom one begins with NO_BB_ (for “no baseband”).
You must enter “Pwned DFU” mode before trying to use the NO_BB_ IPSW with iTunes (and your hosts file cannot be pointing to Cydia’s servers due to the new blob nonce mechanism they’re using in iOS5).
Version 0.9.9b5 only available for Mac for now, until we can do more testing on the Windows version of “Custom IPSW”.
We’re currently working on a normal compatibility update for existing ultrasn0w unlockers.  After that we’ll try to fix the iBooks issue on jailbroken iOS5.
Besides the ability to automatically Jailbreak iOS 5 this version of RedSn0w allows unlockers to update to iOS 5 by creating a custom IPSW (see extras menu). If you would like to download RedSn0w 0.9.9b5 for Mac OS X
Mirror: RedSn0w 0.9.9b5 Mac OS X Download

Download iOS 4.3.4 For iPhone 4, 3GS, iPad 2, 1, And Pod touch [DIRECT LINKS]

As we’ve speculated over the last few days, iOS 4.3.4 made its debut on iTunes. The new release, without clear release notes, addresses the PDF exploit in Mobile Safari used by JailbreakMe.
IPSW
The release notes aren’t clear, only alleging “security fixes”, although we can confirm that JailbreakMe 3.0 doesn’t work in this release. Blocking this untethered jailbreak was Apple’s only goal with this release.
Any device supported by iOS 4.3, namely the 3rd and 4th generation iPod touch, the iPhone 3GS , the iPhone 4 and the iPad. While Apple clearly hadn’t planned for this release in advance, circumstances forced it: with such an important threat in the wild, not only allowing for a jailbreak, which in and of itself Apple dislikes, but also open up a huge breach that could lead unsuspecting users to have malware loaded onto their devices.
JailbreakMe 3.0 is a jailbreaking solution that allows devices to be hacked without a computer, just by pointing Mobile Safari to a JailbreakMe’s website. A pre-released version of this tool was leaked over the weekend, providing an untethered jailbreak for the iPad 2 for the first time ever before the final official release was made last week. Consequently, Apple began working on iOS 4.3.4 to address this issue.
It should be needless to say that if you’ve jailbroken or are planning to jailbreak your iPad 2 using JailbreakMe, stay away from this update and install PDF Patcher 2 from Cydia instead, which provides the same benefits as this update, plus it won’t break your jailbreak.. Most users might as well just wait for iOS 5, which should come out sometime in the Fall.
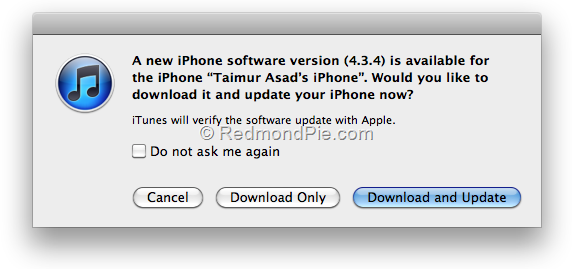
In order to install this update, connect your phone to your computer and launch iTunes, if it hasn’t launched automatically. From there, select your device from the sidebar, click on “Check for Updates” and select “Download and Install” when prompted. After a rather large download, your device should begin to update.
iOS 4.3.4 Install
Direct Download Links for iOS 4.3.4 (Official from Apple)

Redsn0w Can Jailbreak iOS 4.3.5 On iPhone 4, 3GS, iPad, iPod touch. Here’s How To Use It! [Tutorial]


Apple has unexpectedly pushed out an incremental update for iOS 4.3.x, and it is dubbed as iOS 4.3.5. This minor release is no more than a security update, aiming to patch issues with certificate verification.
iOS 4.3 WM
The good news is that we have tested it and can confirm that the current version of Redsn0w can jailbreak the just released iOS 4.3.5 on iPhone 4, 3GS, iPad 1, and iPod touch 4G/3G. But it will be limited to tethered boot, which means you will have to reconnect your device to your computer every time you reboot your iOS device. iPad 2 is obviously not supported. This has also been confirmed by MuscleNerd of iPhone Dev Team:
@zaone @m1ckey29 ah ok thanks for checking! So those who really do want tethered 4.3.5 can use redsn0w pointed at 4.3.4 (except iPad2)
4.3.5 Jailbreak[4]
Note: Those relying on a carrier unlock must stay away from Redsn0w.
How to Jailbreak iOS 4.3.5 (Tethered)
Step 1: Download iOS 4.3.5 and iOS 4.3.4 (required by this version of Redsn0w) firmware file for your device from the links given at the end.
Step 2: Download Redsn0w 0.9.8b4 for Windows or Mac. Also make sure you are running the latest version of iTunes, which is version 10.4.
Step 3: Now start Redsn0w, browse for the iOS 4.3.4 firmware file (NOT the 4.3.5) that you downloaded in Step 1 and point it towards Redsn0w. Refer to the screenshots below:
4.3.4-Jailbreak
4.3.2-Untethered-Jailbreak-2
Step 4: Once Redsn0w is done recognizing the firmware file, click Next and there you’ll be taken to a new window. Simply check the “Install Cydia” box as shown below and leave other options as it is for now. Once done, click Next.
4.3.2-Untethered-Jailbreak-3
Step 5: On this screen, Redsn0w will instruct you to power down your device and plug it in to your computer. Follow the onscreen instructions and then click Next to continue.
4.3.2-Untethered-Jailbreak-4
Step 6: On this screen you will have to put your device in DFU mode with a combination of the Power button and the Home button for a certain amount of time, simply follow the onscreen instructions on how to do so. The combination is usually like this:
  • Hold down Power button for 5 seconds.
  • Now without releasing the Power button, hold down the Home button simultaneously with the Power button for 10 seconds.
  • Let go of the Power button but keep on holding the Home button for another 15 seconds.
If you performed the above mentioned steps correctly, then your device should be in DFU mode.
4.3.2-Untethered-Jailbreak-5
Step 7: Redsn0w will now jailbreak your device, don’t do anything weird at this point, just let Redsn0w finish. We would recommend that you don’t do anything with your PC or Mac at all during the process. Sitting idle and waiting for the process to end on its own is much advised.
Since this is a tethered jailbreak, therefore whenever your iOS device loses power, it will go into the dreaded Apple logo boot screen loop. To get out of that, simply start from Step 3 again and in Step 4, uncheck “Install Cydia” and instead check “Just boot tethered right now” option and hit “Next” with your iPhone, iPad or iPod touch connected to your PC or Mac. And yes, you will have to do this every time when your device reboots or loses power.
Redsn0w-1
That’s it! You should now have a jailbroken iPhone, iPad, or iPod touch running iOS 4.3.5.
Download iOS 4.3.5 for iPhone 4, 3GS, iPod touch and iPad
Download iOS 4.3.4 for iPhone 4, 3GS, iPad, iPod touch
Download Redsn0w 0.9.8b4 for Windows
Download Redsn0w 0.9.8b4 for Mac
Download iTunes 10.4 for Windows & Mac

Download iOS 4.3.5 For iPhone 4, 3GS, iPad 2, 1, And Pod touch [DIRECT LINKS]

ust months before iOS 5 is released and ten days after iOS 4.3.4 came out, one wouldn’t expect to ever hear about iOS 4.3.5. It now turns out that yet another update for iOS 4.3 has been uploaded to Apple’s servers, allegedly fixing a critical security issue.
IPSW
No concrete information about this update has been provided about this update, other than it seems to fix an issue with certificate validation, as pointed out on Apple’s change log:
A security issue has been resolved with certificate verification.
iOS development has been on fire lately, with new updates being rolled out for both iOS 5 betas and iOS 4.3. Over the weekend, iOS 5 Beta was released, containing several enhancements to Apple’s upcoming iOS 5 as the release draws closer and closer. A week earlier, iOS 4.3.4 was released, which contained a security fix for Mobile Safari for a vulnerability that allowed a popular jailbreak method, JailbreakMe 3.0, to function. With 4.3.4 behind us, many has expected iOS 5 to be the next step for iOS but Apple has proven us wrong once again.
While it’s still unclear why Apple hasn’t stopped maintaining iOS 4.3 just several weeks before it’s fully replaced, the only possible explanation could be the gravity of the security vulnerability that was found. Although it might have been Apple’s intention not to update iOS 4 any further, the Cupertino company might have been forced to do it given the circumstances before hackers spotted the vulnerability first and started exploiting it.
If you have a untethered jailbroken device, you are advised to stay as far away from this update as possible.
Non-jailbreak iPhone, iPad, iPod touch users are strongly encouraged to download this update as soon as possible. You can do so by plugging your device into your computer, locating it in the iTunes sidebar and clicking on the "Check for Updates" option. The update should then immediately begin downloading and installing.
Direct Download Links for iOS 4.3.5 (Official from Apple)

iFixIt iPhone 4S Teardown

iFixit has posted a detailed and exhaustively illustrated teardown of the new iPhone 4S. iFixit’s Director of Technical Communication Miroslav Djuric says with the help of an iFixit user hailing from Germany, Markus Weiher, the iFixit team successfully dismantled Apple’s latest creation. Not even Siri’s incessant urgings and warnings were enough to deter the team from dissecting it.
“Opening the 4S was no more (nor less) challenging than the iPhone 4,”says Djuric. “We’re always pleased to find a limited amount of adhesive in our patients, and easily removable rear panels are always a plus. However, the same pesky proprietary screws are present, and it’s never a joy to encounter fused (read: expensive to replace) displays. All things considered, the new iPhone isn’t any easier or harder to repair than last year’s model, so it gets the same 6 out of 10 repair score as the previous-gen iPhone 4.”
Djuric notes that there is an extra .05 watt-hours in the battery over the iPhone 4, and according to Apple, you get an extra hour of talk time on 3G, but 100 hours less standby time.
In the iFixit fashion, they removed the EMI shields for your viewing pleasure. The logic board bares its electronic soul with the foillowing components:
* Apple A5 dual-core processor with 512 MB RAM
* Toshiba THGVX1G7D2GLA08 16 GB NAND flash memory
* Qualcomm MDM6610 baseband chipset
* Qualcomm PM8028 power management IC
* Qualcomm RTR8605 Multi-band/mode RF transceiver
* Murata SW SS1830010. We suspect that this package contains the Broadcom chip that reportedly provides Wi-Fi/Bluetooth connectivity, just like in some of the past teardowns.
* Skyworks 77464-20 load-insensitive power amplifier (LIPA) module developed for WCDMA applications
* Avago ACPM-7181 power amplifier
* TriQuint TQM9M9030 multi-mode quad-band power amplifier module
* TriQuint TQM66052 (possibly a PA-duplexer module)
* Mysterious Apple chip with markings 338S0987 B0FL1129 SGP


Photo Courtesy iFixIt

Some snippets:
They note that Apple boasts 73% more light with “next-generation backside illumination” for better low-light performance with the iPhone 4S’s new megapixel camera roughly 33% faster and able to snap multiple photos less than a second apart as well as record HD video at 1080p and 30 fps.
They report that the iPhone 4S logic board bears a close resemblance to its stateside CDMA iPhone 4 counterpart, but the display assembly appears to be the same as the one found in the GSM version.
t appears that Apple elected to go with the linear oscillating vibrator that was found in the Verizon iPhone 4, as opposed to the rotational electric motor with counterweight in the AT&T version. This vibrator motor is quieter, softer, and all-around less annoying than its counter-weighted predecessor.
Djuric says thry noticed several white and red liquid indicator strips placed throughout the phone. So don’t let your friends pee on it! (No, seriously: http://bit.ly/iPhone_3GS_pee)

Photo Courtesy iFixIt

The iPhone 4S’s Apple A5 chip is revealed to be a 1 GHz Dual-core processor with 512 MB of Samsung DDR2 RAM or Elpida DDR2 RAM, and there’s Toshiba THGVX1G7D2GLA08 16 GB 24 nm MLC NAND flash memory as well as the same 960 x 640 pixel Retina display that debuted in the iPhone 4 last year.

Photo Courtesy iFixIt

iFixIt gives the iPhone 4S a Repairability Score of 6 out of 10 (10 is easiest to repair), with very little changed from the iPhone 4 in terms of repairability, noting that the iPhone 4S is still held together primarily with screws and limited adhesive, and with the rear panel and battery both easy to remove and replace (provided you have the right kit and/or correct screwdriver), but the LCD and glass — a carryover from the previous generation iPhone 4 — are fused together, making cracked glass repair more costly, and lots of smaller components are soldered to one ribbon cable, increasing the cost of repairing just one component.
Incidentally, if you’re at all a tinkerer with your computers and iDevices, iFixIt’s hardware teardowns and free illustrated teardown guides are an amazingly helpful resource.