how to fix black screen (iphone 3g ,iphone 3gs,iphone 4,iphone 4s,iphone 5,iphone 5s ,iphone 6,iphone 6S)


How to fix your blank iPhone screen

Don’t panic! The blank screen on your iPhone 3G, 3GS, 4 iPhone 5s and 6 can be fixed, easily!
Fortunately, I worked out that you can fix this problem by resetting your phone. Here’s how:
Press and hold down the Sleep/Wake button and the Home button simultaneously for at least 10 seconds. The screen will clear out and then the Apple Logo will appear on the black background. When the logo appears it means that the reset is done.
Afterwards you’ll see your screen light up and you’ll be able to breath a sigh of relief!

fixed :Recover and Restore iPhone 3GS with Error 1015 stuck in Recovery Mode in iTunes


What you will need is the original IPSW Image from Apple or 4.2.1 or  4.3.3
A Custom Restore Image 4.3.3 IPSW if you have lost your own, one is filed here with a prefix of NO_BB so it will preserve your existing baseband.
Get the latest Redsn0w – RedSn0w  —  Mac is 0.9.9b7.zip and Windows is 0.9.9b7.zip
1) Make sure iTunes is not running.
1) Launch redsn0w > Browse – select the original Apple Restore Image IPSW – iPhone2,1_4.2.1 or  iPhone2,1_4.3.3
2) Select your correct model according to the Serial Number – let redsn0w parse the image
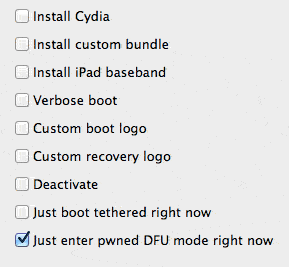
3) Select only “Just enter pwned phone in DFU mode right now“
Put iPhone into DFU mode using redsn0w
4) Follow the steps in redsn0w to get the iPhone 3GS into DFU mode which is going to send the screen to black
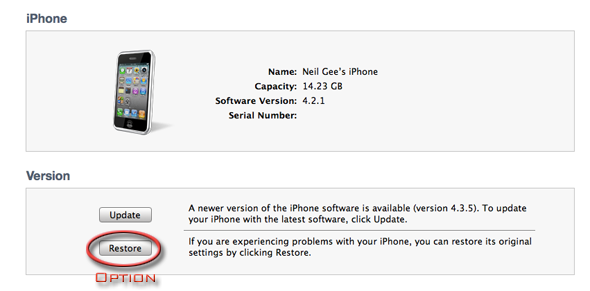
5) Launch  iTunes, hold the shift/option key whilst clicking on “Restore”, then navigate and choose the custom restore –  either your own or the downloaded one that starts with NO_BB (which preserves the existing baseband).
Option click restore to restore iphone from custom IPSW
Option/shift click restore to restore iphone from custom IPSW
6) Say a prayer
7) You should now boot up to a familiar screen, happy days!
8 ) Restore data from iTune backup.

To Re-Jailbreak

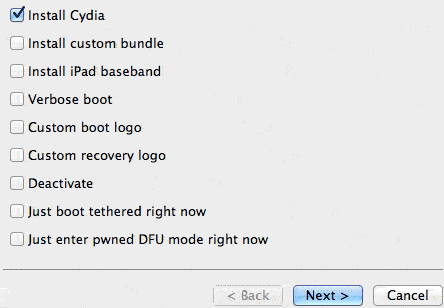
1) Launch redsn0w this time selecting the original Apple restore image –   iPhone2,1_4.2.1_8C148a_Restore.ipsw, or iPhone2,1_4.3.3_8J2_Restore.ipsw  and  only select the option to “Install Cydia”.
Install Cydia from redsn0w to jailbreak iPhone
2) It will need to enter DFU mode again, follow the steps and the screen goes black, and then the jailbreak process begins, unix flying bash code and running pineapples.
3) iPhone reboots – install ultrasn0w from Cydia to re- jailbreak the device.


problem :No SIM card error iphone 6 6s 6 plus 6s plus


No SIM card error

A few people have run into a glitch where the iPhone 6 keeps complaining about the SIM card. It might say “Invalid SIM” or “No SIM card installed”. There are a few things worth trying.
Potential solutions:
  • Try toggling Airplane mode on and off again.
  • Restart your iPhone by turning it off and on again.
  • If you recently inserted the SIM card and started getting the error then there’s a chance it’s damaged or dirty. Try popping it out and taking a look. You can use a pencil eraser to clean the gold contacts and then blow away the debris before putting it back in your iPhone.
  • Make sure that your software is fully up to date via Settings > General > About.
  • Try the SIM card in another device if you have a compatible device, or try a different SIM card in your iPhone 6.
  • If the problem persists then contact your carrier or Apple.

How to factory reset an iPhone using the smartphone


Step 1: Prepare your iPhone for restoration
Connect your iPhone to your computer via USB and click the gray Back Up Now button when viewing the Summary tab for your given device in iTunes. Alternatively, follow our guide on how to use iCloud to back up the device you Apple’s remote servers. Although backing up your device is not necessary, doing so will store your photos, apps, contacts, settings, and other data so you can automatically restore other iOS devices from the backup down the line.
Step 1: Access the Reset menu
Tap the main Settings icon when viewing the homescreen, select the General option on the resulting menu and tap the Reset button at the bottom of the next page.
iPhone Reset
Step 2: Reset your iPhone  
Tap the blue Erase All Content and Settings option second from the top, followed by the red Erase iPhone option in the resulting pop-up window to confirm the decision.
iPhone Erase All Content and Settings
Step 3: Ensure the phone was restored
Once the restoration process is complete — a process that may take up to several minutes — check to ensure the phone has been restored to the original factory settings. If done correctly, you’ll once again be presented with the iOS Setup Assistant upon startup, from which you can then restore your phone from backup or continue the process as if setting up a new phone entirely.
iPhone Hello


How to factory reset an iPhone using iTunes


Step 1: Prepare your iPhone for restoration
Click the iTunes menu located on the left side of the main iTunes toolbar, select Check for Updates from the resulting drop-down menu and ensure you have the latest version of iTunes. If not, download and install the latest version thereof. Afterward, connect your iPhone to your computer via USB and click the gray Back Up Now button when viewing the Summary tab for your given device in iTunes. Alternatively, follow our guide on how to use iCloud to back up the device you Apple’s remote servers. Although backing up your device is not necessary, doing so will store your photos, apps, contacts, settings, and other data so you can automatically restore other iOS devices from the backup down the line.
Check for Updates for iPhone
Step 2: Restore your iPhone
Once the backup is complete, click the gray Restore iPhone button when viewing the Summary tab for your given device in iTunes. Click the Restore button in the resulting pop-up window to confirm your decision, and if prompted, click the Agree button to agree to the software license agreement and begin downloading the necessary iOS software file before restoring.
Restore iPhone
Step 3: Ensure the phone was restored
 Once the restoration process is complete — a process that may take up to several minutes — check to ensure the phone has been restored to the original factory settings. If done correctly, you’ll once again be presented with the iOS Setup Assistant upon startup, from which you can then restore your phone from backup or continue the process as if setting up a new phone entirely. It’s like it just came off the assembly line at Foxconn all over again.
Set up iPhone as New Phone

Problem: Home button not working (iphone 6 iphone 6 plus)


Problem: Home button not working

If pressing the home button on your iPhone doesn’t always get a response, then the device may have a problem, even if the issue is intermittent.
Solution:
  • Apple is apparently aware of a manufacturing issue with the Home button on some iPhone models. Make an appointment with the Genius Bar at your local Apple Store to discuss the issue.

How to Share Your iPhone Internet Connection With Your PC (wifi,Bluetooth,USB)


Create a Hotspot to Tether Any Device With Wi-Fi

If you have a Mac, scroll down — you can do this more easily. But you can connect any type of device to the Internet through your iPhone. This means Windows laptops, Chromebooks, Android tablets, iPads, portable gaming consoles, and more — anything at all that can connect to Wi-Fi.
To get started, open your iPhone’s Settings screen and tap the Personal Hotspot option between Cellular and Carrier near the top of the screen. If you don’t see the option, contact your carrier — it’s possible you have to pay them extra before you can see and use it.
Enable the Personal Hotspot feature and your iPhone’s top bar will turn blue, indicating that the personal hotspot is running in the background and draining your battery.
Your iPhone will now appear as a nearby wireless network. On any device with a Wi-Fi connection, open the list of networks and choose your device in the list — it’ll be named something like “[Name]’s iPhone.” Select it in the list and you’ll be asked for a passphrase. Enter the passphrase displayed on the Personal Hotspot screen on your iPhone. Your device will connect.
When you’re done, pick up your iPhone and disable the Personal Hotspot feature to save battery life. This is easy — your iPhone’s top bar will be blue as long as the Personal Hotspot feature is enabled. Tap it and you’ll be taken directly to the Personal Hotspot screen, where you can disable it.

Easy Wi-Fi Tethering on a Mac

Mac OS X Yosemite makes these things work well together. Click the Wi-Fi icon on the menu bar, and you’ll see your nearby iPhone appear under “Personal Hotspot.” Click it, and your Mac will automatically connect to the iPhone, enabling the Wi-Fi hotspot feature and allowing you to connect directly to the Internet.
This is convenient because it allows you to quickly connect to your iPhone from your Mac without leaving the personal hotspot feature enabled all the time. You can do this entirely from your Mac without picking up your iPhone and tapping anything. It’s only enabled when you connect to it. This saves battery life.

USB Tethering on a Mac

You can also connect your iPhone to your computer via a USB cable — not a bad idea, as the iPhone can draw power from your Mac and its battery won’t be run down by the tethering.
Go into your iPhone’s Setting screen, tap Hotspot, and Personal Hotspot near the top of the list, and enable Personal Hotspot. You can then click the WI-Fi icon on the menu bar and select Open Network Preferences. You’ll see that your Mac is tethered to the iPhone using the “iPhone USB” connection. If you don’t see it in the list, click the “+” button and add the iPhone USB network interface.

USB Tethering on Windows

USB tethering can al;so function with a Windows PC. You’ll need the latest version of iTunes installed on your Windows PC to do this, as it includes the appropriate drivers. Enable Personal Hotspot on your iPhone and then connect it ot the Windows PC using a USB cable. Your Windows PC will be able to use the iPhone as a network connection, just as a Mac could.
This should automatically configure itself if you plug your iPhone in with Personal Hotspot enabled. You’ll see the network connection appear as an “Apple Mobile Device Ethernet” connection.


iPhones also support Bluetooth tethering. Pair your iPhone with a computer or other device over Bluetooth to share the Internet connection using Bluetooth. Wi-Fi tethering will be easier to set up and faster. However, Bluetooth tethering could potentially drain your iPhone’s battery more slowly, saving some battery life.